
More Status Updates
-
3/4:
I hear the kids playing saying, "you be mommy, I'll be daddy." I suggest
that they play something else as there are plenty of other games. Amara
says...
14 years ago

So "I Heart Faces" only allows for 1 photo to be submitted, but I just had to share the others, because Amara seriously was the sweetest sleeper.
1 Month Old here:
15 Months Old here - look at the little curls finally starting to come in:
Evidence that Dominic did occasionally sleep - 5 weeks old here:
He just preferred to sleep ON people. The date's wrong on this picture -- should be 7/26 -- so he was 1 month old.
 Posted on
-
1 Comments
Posted on
-
1 Comments
A few months ago I discovered "I Heart Faces" and the beautiful photos just captivated me. I haven't participated much, but this week, the theme is "Sweet Dreams" and I just couldn't resist.
My first born has always been such a peaceful sleeper. I just looked back through my photos and found several of her sleeping so beautifully -- it was hard to narrow down an entry (I'll have to post the other ones, t00).
My second born, on the other hand -- I could only find one sleeping picture. He just didn't sleep long enough to get the camera out! Thankfully he sleeps MUCH better now, but he was definitely not a sleeping infant!
So here is my submission for "I Heart Faces" Week 48 Challenge. My daughter, age 5 weeks, with my husband. It's actually been made into a scrapbook page, hence the text.
Posted on
-
4 Comments
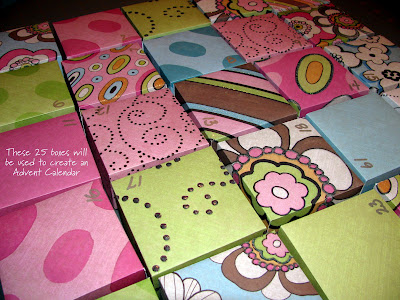
I’m so excited about the Advent Calendar the kids and I have been working on. I grew up with an Advent Calendar as a part of our Christmas celebration. We eagerly opened each door to find the candy behind it. We’d read the Advent devotionals, light the advent wreath/candles each Sunday, excitedly anticipating Christmas Day and Jesus Birth.
This year I wanted to find a way to combine all of those traditions and point to the Savior each day. I didn’t care so much about the chocolate – I wanted something else to be “hidden” behind each door. I wanted the kids to seek Jesus. He is, after all, the reason for the season.
So this is the result of my quest to create the “perfect” Advent calendar. I hope you enjoy it! And I’d LOVE to hear about your Advent traditions.
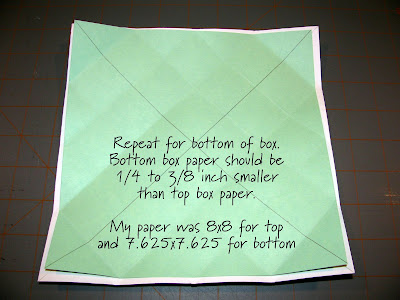
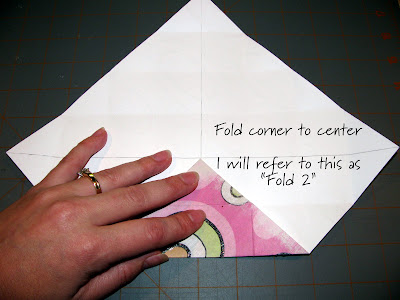
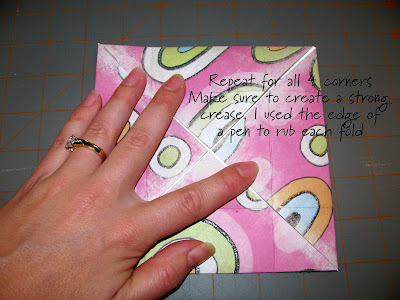
To create the “scene” for my Advent calendar, I purchased a miniature Christmas tree (or will purchase one).
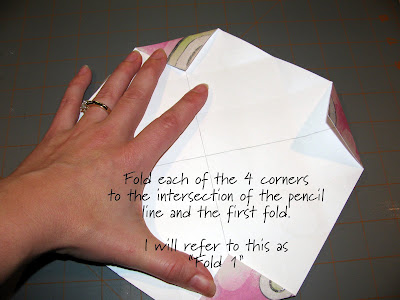
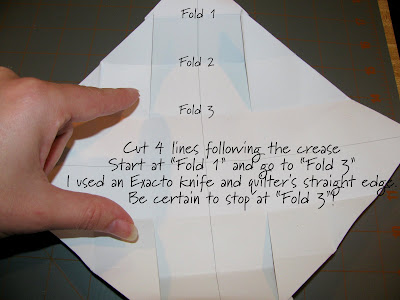
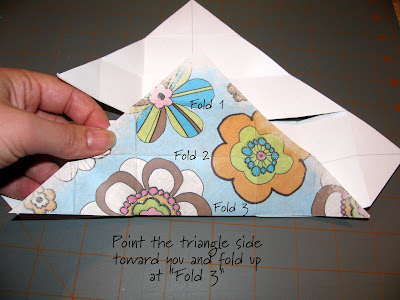
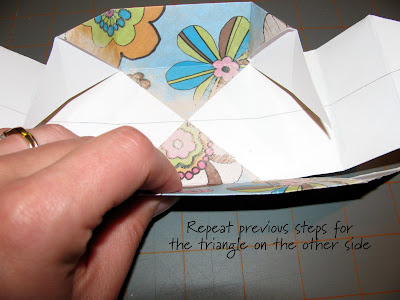
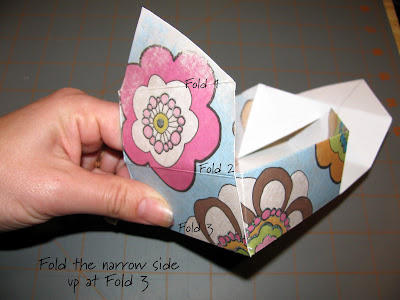
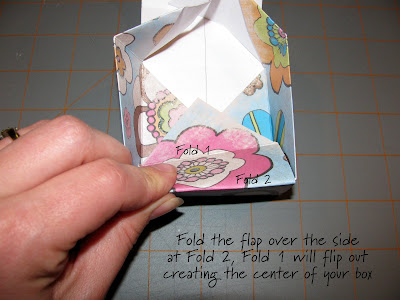
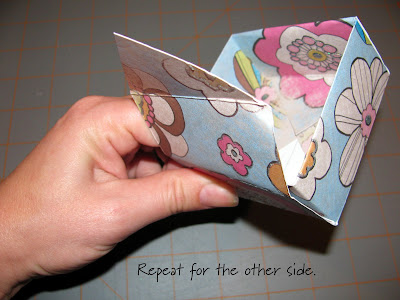
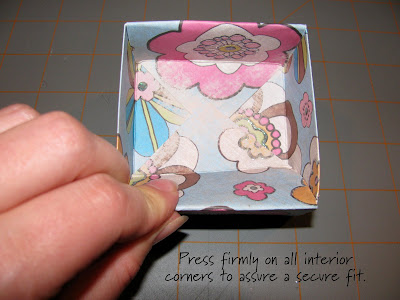
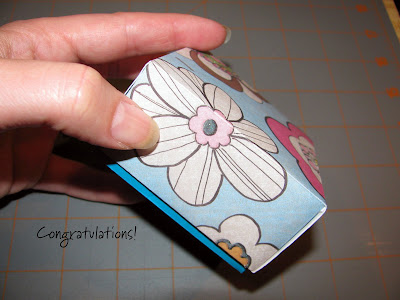
Under the Christmas tree, I placed 25 folded paper boxes (directions for how to make these are listed below). I numbered each box 1 through 25. So box 1 would be open on December 1st, and so on. Now I do realize that Advent traditionally begins on the 4th Sunday before Christmas, but for simplicity sake, and so that we can reuse this from year to year, we’re doing it 25 days of December.
Within each box is a phrase, a Bible verse, and a symbol. I put the phrase and Bible verse for each day on the inside of the box top (i.e. Day 1 says, “We anticipate Jesus birth, just as they did many years ago.” The Bible verse, “Isaiah 11:1 Psalm 27:14” will immediately follow it.) I’m only putting the Bible verse reference on the box top – my purpose, especially as the kids grow up, is to have them look up and read each verse.
Within the inside of the box on the bottom is what the symbol for the day is (i.e. Day 1 says, “Branch.”) This reference corresponds to the symbol that will be inside. The symbol will be in the form of an ornament, which will be hung on the tree. For right now, I used clip art to make all the symbols. I cut them out in circles, laminated them, punched holes, and they will be ornaments. Moving forward, the kids and I will be on an ornament quest to find all of the proper symbols for each day in miniature to be made into an ornament.
Beginning on Day 18, we’ll build a Nativity Scene in front of the tree. So rather than ornaments, I’ll find a miniature nativity and put one piece in each box. The culmination, of course, will be Baby Jesus lying in a manger on Christmas Day.
I’m very eager to begin this tradition with my kids! We’re building and stuffing the boxes over Thanksgiving weekend. I welcome you to join me in this quest to point your children towards Jesus. Below I’ve listed each day, the phrase, the Bible verse, and the symbol. I’ve also included pictorial step-by-step directions for how to make the paper boxes. Please let me know if you decide to join me!
DAY 1: We anticipate Jesus’ birth, just as they did many years ago.
Isaiah 11:1 - A shoot will come up from the stump of Jesse; from his roots a Branch will bear fruit.
Psalm 27:14 - Wait for the LORD; be strong and take heart and wait for the LORD.
Symbol: Branch
DAY 2: The Bible teaches us about God the Father, Son and Holy Spirit.
John 1:1-2 - In the beginning was the Word, and the Word was with God, and the Word was God. He was with God in the beginning.
2 Timothy 3:16-17 - All Scripture is God-breathed and is useful for teaching, rebuking, correcting and training in righteousness, so that the man of God may be thoroughly equipped for every good work.
Symbol: Bible
DAY 3: Jesus came because we are sinners.
Genesis 3:6-7 - When the woman saw that the fruit of the tree was good for food and pleasing to the eye, and also desirable for gaining wisdom, she took some and ate it. She also gave some to her husband, who was with her, and he ate it. Then the eyes of both of them were opened, and they realized they were naked; so they sewed fig leaves together and made coverings for themselves.
1Timothy 1:15 - Here is a trustworthy saying that deserves full acceptance: Christ Jesus came into the world to save sinners—of whom I am the worst.
Symbol: Apple
DAY 4: Jesus paid the price for our sins.
Romans 5:8 - But God demonstrates his own love for us, in that while we were still sinners, Christ died for us.
Hebrews 12:2 - Let us fix our eyes on Jesus, the author and perfecter of our faith, who for the joy set before him endured the cross, scorning its shame, and sat down at the right hand of the throne of God.
Symbol: Cross
DAY 5: Jesus came because God loves us.
John 3:16 - For God so loved the world that he gave his one and only Son, that whoever believes in him shall not perish but have eternal life.
Symbol: Heart
DAY 6: Because of Jesus, we can have eternal life.
John 3:36 - He who believes in the Son has eternal life; but he who does not obey the Son will not see life, but the wrath of God abides on him.
Symbol: Ring (eternal)
DAY 7: Jesus came so that we could join God’s family.
John 1:12 - But as many as received Him, to them He gave the right to become children of God, to those who believe in His name.
Symbol: Family Photo
DAY 8: Our joy comes from the Lord.
Psalm 126:3 - The LORD has done great things for us, and we are filled with joy.
Psalm 16:11 - You have made known to me the path of life; you will fill me with joy in your presence, with eternal pleasures at your right hand.
Symbol: JOY Ornament
DAY 9: Jesus wanted to show us the way to the Father.
John 14:6-7 - Jesus answered, "I am the way and the truth and the life. No one comes to the Father except through me. If you really knew me, you would know my Father as well. From now on, you do know him and have seen him."
Symbol: Compass
DAY 10: He is the Alpha and the Omega.
Revelation 1:8 - I am the Alpha and the Omega," says the Lord God," who is and who was and who is to come, the Almighty."
Revelation 21:6 - And He said to me, “It is done! I am the Alpha and the Omega, the Beginning and the End. I will give of the fountain of the water of life freely to him who thirsts.
Revelation 22:13 - I am the Alpha and the Omega, the First and the Last, the Beginning and the End.
Symbol: Alpha and Omega Ornament
DAY 11: He is the Lamb of God.
John 1:36 - When he saw Jesus passing by, he said, "Look, the Lamb of God!"
Symbol: Lamb
DAY 12: He is the Door.
John 10:9 - I am the door. If anyone enters by Me, he will be saved, and will go in and out and find pasture.
Symbol: Door
DAY 13: He is the Good Shepherd.
John 10:14-15 - I am the good shepherd; I know my sheep and my sheep know me— just as the Father knows me and I know the Father—and I lay down my life for the sheep.
Symbol: Candy Cane
DAY 14: He is the Light of the World.
John 8:12 - When Jesus spoke again to the people, he said, "I am the light of the world. Whoever follows me will never walk in darkness, but will have the light of life."
Symbol: Candle
DAY 15: He is the Bread of Life.
John 6:35 - Then Jesus declared, "I am the bread of life. He who comes to me will never go hungry, and he who believes in me will never be thirsty.
John 6:51 - I am the living bread that came down from heaven. If anyone eats of this bread, he will live forever. This bread is my flesh, which I will give for the life of the world."
Symbol: Bread
DAY 16: He is the King of Kings.
Revelation 19:16 - On his robe and on his thigh he has this name written: KING OF KINGS AND LORD OF LORDS.
Symbol: Crown
DAY 17: Jesus Christ is the greatest gift.
Romans 6:23 - For the wages of sin is death, but the gift of God is eternal life in Christ Jesus our Lord.
James 1:17 - Every good and perfect gift is from above.
2 Corinthians 9:15 - Thanks be to God for his indescribable gift!
Symbol: Present
DAY 18: Jesus was born in a humble stable. (Begin to set Nativity Scene.)
Luke 2:12 - This will be a sign to you: “You will find a baby wrapped in cloths and lying in a manger."
Symbol: Manger
DAY 19: Angels told the good news that the Savior was born.
Luke 2:8-14 - And there were shepherds living out in the fields nearby, keeping watch over their flocks at night. An angel of the Lord appeared to them, and the glory of the Lord shone around them, and they were terrified. But the angel said to them, "Do not be afraid. I bring you good news of great joy that will be for all the people. Today in the town of David a Savior has been born to you; he is Christ the Lord. Suddenly a great company of the heavenly host appeared with the angel, praising God and saying, "Glory to God in the highest, and on earth peace to men on whom his favor rests."
Symbol: Angel
DAY 20: Shepherds came to worship Jesus.
Luke 2:15-20 - When the angels had left them and gone into heaven, the shepherds said to one another, "Let's go to Bethlehem and see this thing that has happened, which the Lord has told us about." So they hurried off and found Mary and Joseph, and the baby, who was lying in the manger. When they had seen him, they spread the word concerning what had been told them about this child, and all who heard it were amazed at what the shepherds said to them. But Mary treasured up all these things and pondered them in her heart. The shepherds returned, glorifying and praising God for all the things they had heard and seen, which were just as they had been told.
Symbol: Shepherds
DAY 21: A star lit the way to Jesus.
Matthew 2:9-10 - The star which they had seen in the East went before them, till it came and stood over where the young Child was. When they saw the star, they rejoiced with exceedingly great joy.
Symbol: Star
DAY 22: Wise men came to worship Jesus.
Matthew 2:11 - And when they had come into the house, they saw the young Child with Mary His mother, and fell down and worshiped Him. And when they had opened their treasures, they presented gifts to Him: gold, frankincense, and myrrh.
Symbol: Wise Men
DAY 23: Jesus’ mother was Mary.
Isaiah 7:14 - Therefore the Lord himself will give you a sign: The virgin will be with child and will give birth to a son, and will call him Immanuel.
Luke 1:30-33 - The angel said to her, “Do not be afraid, Mary, for you have found favor with God. And behold, you will conceive in your womb and bring forth a Son, and shall call His name JESUS. He will be great, and will be called the Son of the Highest; and the Lord God will give Him the throne of His father David. And He will reign over the house of Jacob forever, and of His kingdom there will be no end.”
Symbol: Mary
DAY 24: Mary was to be married to Joseph.
Matthew 1:20-23 - An angel of the Lord appeared to him in a dream and said, "Joseph son of David, do not be afraid to take Mary home as your wife, because what is conceived in her is from the Holy Spirit. She will give birth to a son, and you are to give him the name Jesus, because he will save his people from their sins." All this took place to fulfill what the Lord had said through the prophet: "The virgin will be with child and will give birth to a son, and they will call him Immanuel"—which means, "God with us.
Symbol: Joseph
DAY 25: Jesus, the Savior, is born!
Isaiah 9:6 - For to us a child is born, to us a son is given, and the government will be on his shoulders. And he will be called Wonderful Counselor, Mighty God, Everlasting Father, Prince of Peace.
Revelation 22:16 - I, Jesus, have sent my angel to give you this testimony for the churches. I am the Root and the Offspring of David, and the bright Morning Star.
Symbol: Baby Jesus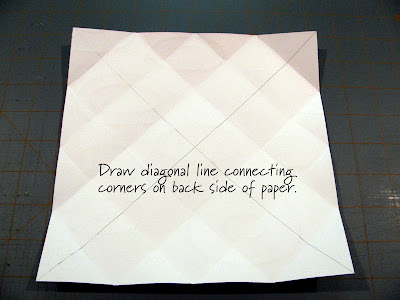


Posted by
Sarah
In:
Crafts,
Praise and Worship
Posted on
-
23 Comments
A few posts ago, I asked for your help in selecting Bible verses for my 2010 digital scrapbook calendar. Thanks to those of you who offered ideas! I'm happy to say, the templates are NOW DONE! If you're interested in downloading free templates to add your own pictures and papers to, they're available at my Simply Sarah Design blog for digital scrapping. Hop on over and grab them!
SPOILER ALERT:
To my family -- now is the time to TURN AWAY. There is no need to read the rest of this post. I know... why share it if I don't want you to see it, right? Well... you know how good I've never been with surprises. :) You'll see it soon enough... live and in person.
I really struggled with the templates and how I wanted to create this year's calendar. I think I tried a few different designs and approaches before settling on this one. I just haven't had time to scrap like I'd like to, which means my creative juices have built up quite a few cobwebs (similar to the back deck, I discovered). When I first put this idea to paper, I thought, man, how incredibly uncreative and boring! But, the message was getting through, and that was my priority anyway. So I took a page from an old digital scrapping friend (Glenda - I should really reach out to her again), and said, "Self, I'm done -- the memory is preserved."
As I worked on the first 4 pages and began adding little extra photos to make the pages more than just the template, I realized that the design was growing on me. Thank goodness! Sometimes the simple clean lines allow the photos to speak for themselves better anyway.
So... since I've been awful silent this week from a blog perspective (nothing to say! Sorry! OK... those who know me well know that doesn't typically happen.....) Anyway, since I've been not blogging.... I hope you'll enjoy some pictures instead. (Here's hoping Lulu.com prints them RIGHT this year.)


Posted by
Sarah
In:
Crafts
Posted on
-
1 Comments
For the last 2 years, I've given my family a calendar for the next year as a Christmas gift. This isn't just a normal calendar, this is a digital-scrapbook calendar that I design and include the kids' pics, etc. In the process of designing it, I also include templates for other digital scrappers to create their own similar calendar. Here's what I shared in 2009.
I hadn't really given any thought to what I'd do for 2010. In fact, I'm so far behind on my own scrapping, that I didn't know if I'd do it at all. But yesterday, a sweet woman asked if I was planning to do a calendar again for 2010. And really -- it's such an easy gift to make for my family, and one that I know they appreciate. and I kinda like the one hanging on my wall, too.
So I'm going to do it again. 2010 calendar, here I come.
However, I need help.
Each year, I try to do a Bible verse for each month. More than just verses this year, I want to make sure the message of salvation comes across. (I'd like to do this for the benefit of those downloading the templates and those who happen to see the calendars on the walls, more than for the benefit of my family, who thankfully knows and has accepted the salvation message.) But I'd also kind of like the verse to fit the "theme" of each month. For example, January = new/beginning, February = love, March = spring, April = Easter, etc.
Here are some ideas I've started with:
JANUARY: In the beginning was the Word, and the Word was with God, and the Word was God. John 1:1
FEBRUARY: God demonstrated His love toward us, in that while we were yet sinners, Christ died for us. (Romans 5:8)
JUNE: "I am the light of the world. He who follows Me shall not walk in darkness, but have the light of life." (John 8:12)
So... who can help me fill in the verses for each month? Suggestions?
Posted by
Sarah
In:
Crafts
Posted on
-
2 Comments


Posted on
-
8 Comments
Well...


Posted by
Sarah
In:
Crafts
Posted on
-
0 Comments
I'm a little (ok a lot) late in posting these. It took me a full week to get the photos taken! :) But here are the completed projects.
The first is the picture of Dominic's name painting. It's 16x20 and really will work well in his room. The side is a little darker than the photo appears -- the flash over-exposed it slightly. He thinks it's pretty cool, and now Amara's all over me to get hers finished! It's going to have to wait til after vacation though.

On the other hand, I did make her a project this weekend. I found some of the cute pre-smocked, pre-hemmed fabric at WM a few weeks ago. I added grosgrain ribbon in 3 colors in the bottom, and a ribbon tie around the neck, and it makes a super cute little dress! Oops, no pictures. That will have to come later!
The next pictures are of the nap mats I made the kids. They loved them, which makes me happy! :) The first photo is unrolled with their respective pillows. The second photo is all rolled up. Check out the different ribbons for Dominic's.


Posted by
Sarah
In:
Crafts
Posted on
-
0 Comments
After a week like I had last week (i.e. stressful), a crafty weekend seemed in order to decompress and destress. I won't add that the house REALLY needed cleaning and laundry REALLY needed washing -- because that didn't get done at all! But I had a blast creating things and felt SO much better on Sunday night.
So what did I make? Nap Mats and Name Paintings (or at least I started).
I got a lot of inspiration from Endless Possibilities on the Name Paintings. She does such a fabulous job! I wanted to make them for Amara and Dominic's room, and potentially start making them as gifts for friends and family if I like how they turn out. I didn't get very far yet -- I've got the base and sides of Dominic's painted -- now just to add his name, and potentially some stitching. Amara's is going to be a bit more detailed. I'm matching both of their beddings, and Dominic's is just a more simple, blocky, straight forward design. Amara's is going to be stripes and dots. It's a work in process, and I'm remembering just how much I love painting -- even if my talent doesn't quite match my love! I'll get some photos taken of the progress so that I can share it here.
The nap mats, on the other hand, are complete. I'm so excited by how they turned out. The kids were ecstatic to take them to school and had to show their teachers before hanging them on their hooks. I had one mom ask me to teach her how to make them (she doesn't know how to sew, so I'm not sure how well I'd be able to teach), and Amara's teacher said someone asked if I was going to sell them. Um... nope. If I wasn't working, maybe. But for me personally, crafty things are more fun to make and give away than they are to sell. Typically people can't/won't afford to spend the amount it would take to make it worth my time (4+ hours) plus supplies (approx $20). But I'd be happy to teach them how to do it!
So for the nap mats, and again I'll need to take photos to share them. Amara's is flowers/butterfly themed, and Dominic's is sports themed (surprise surprise).
Amara's bottom (the side touching the ground and visible when rolled up) is patchwork navy denim and hot pink floral calico. The part she lays on is white flannel with pink, yellow, turquoise, purple (probably more colors too) polka dots. Then the pillow and attached blanket are hot pink fleece with butterflies and flowers in multiple colors. It's bound together with hot pink grosgrain ribbon.
Dominic's bottom is patchwork navy denim and khaki. The part he lays on is sports themed flannel that's predominantly khaki. The pillow and attached blanket are sports ball fleece that's predominantly royal blue with larger balls than that on the flannel. It's bound together with 3 separate grosgrain ribbons -- one with footballs, one with basketballs, and one with soccer balls. He actually cried last night when he realized his nap mat is at school and he can't sleep on it at night. Does a Momma's heart good when her kids love what she's made for them! :)
I'll need to print these up and maybe take pictures of each step, but I'd like to share the instructions with anyone who cares to make the mats. They're really quite easy if you've got a sewing machine and can sew/cut a straight line! :)
MATERIALS:
- (SURFACE) 1 yard flannel fabric (to lay on)
- (BLANKET) 1 yard fleece fabric (can get up to 1.5 yards if you want the blanket to cover more of the mat)
- (BASE 1) 1 yard "stronger" fabric (as base) - calico is OK, but denim type may be more durable
- (BASE 2) 1 yard contrasting "stronger" fabric (as base)
- (INSIDE) 1 bag Queen Size Quilt Batting
- 1 Spool / Bobbin of Coordinating Thread
- Approximately 3-4 yards of Grosgrain Ribbon (usage and desired length may vary -- I just bought a spool)
INSTRUCTIONS:
1) Cut (BASE 1) and (BASE 2) fabrics into 9" wide strips
2) Sew the (BASE 1) and (BASE 2) fabrics together into panels 3 strips wide. You should end up with about 4 panels. 2 panels will be patterned 1:2:1, and 2 panels will be patterened 2:1:2.
3) Cut each of the panels into 9" wide strips.
4) Lay your cut strips out onto a table alternating between the 1:2:1 and 2:1:2 strips creating a checkerboard pattern.
5) Sew each of the cut strips together, right sides together so that the seam stays to the back -- I make my mats 7 layers long: 1:2:1 / 2:1:2 / 1:2:1 / 2:1:2 / 1:2:1 / 2:1:2 / 1:2:1
6) Lay the flannel (SURFACE) face up on the table. Lay the 7 layer long (BASE) on top of it. Trim the flannel to be the same size as the (BASE).
7*) Your flannel MAY NOT BE LONG ENOUGH to span the entire length of the base. This was the case in 2 of the 3 mats I made. I trimmed the side off and sewed it to the top, making it long enough, and making that space look like a "pillow" area. I covered the seam created with grosgrain ribbon so that it looked intentional, rather than patched.
8) Make sure your (BLANKET) has right angle edges -- this may or may not require trimming, depending upon how well it was cut at the store.
9) Pin grosgrain ribbon (3 streamers per side) to the (FACE) side of the (BASE) so that you can sew it into the base seam -- they should go on the foot side and I positioned them to the outer edge of the middle block.
10) Layer your materials in the order and direction listed:
(a) SURFACE - FACE UP
(b) BLANKET - FACE UP (I aligned the blanket about 1 foot from the top and about 6-9 inches from the bottom) -- make sure that the blanket comes OFF one side, but is folded smoothly into the middle so that you don't sew the other side. Only ONE side of the blanket will be attached to the nap mat
(c) BASE - FACE DOWN -- Ribbons should be between the layers and not visible
(d) INSIDE - I folded the queen size quilt batting so that it was 3 layers thick. It will be too long -- cut off that excess and save it to make a pillow.
10) Pin all 4 layers together along the edges
11) Trim the batting and any "mismatched" edges using your (BASE) as a cutting guide
12) Sew around 3 sides of the 4 layer group, batting side up -- long edge, foot, long edge. I set the machine to the "left", giving it about a 3/4" seam allowance
13) Flip the nap mat inside out (after removing all pins!)
14) Hand sew the top part of the nap mat to close it off.
15) Trim off excess fabric from (BLANKET) -- I cut the blanket about 9-12 inches past the edge of the mat so it will adequately cover my child.
16) Cut fringe into the (BLANKET) if desired. Because it's fleece, it won't ravel, but the fringe makes it look a little bit more finished.
17) Roll it up and add snaps (or buttons / velcro -- I like snaps because velcro snags, and kids often can't do buttons) to the ribbon ties so that you can secure the mat shut. The middle ribbon in each grouping of 3 becomes the shoulder strap -- add snaps to that, too.
PILLOW INSTRUCTIONS:
1) Fold leftover fleece in half with front side UP.
2) Cut in half at the fold.
3) Maintaining the layers, cut fringe along all 4 sides (the corners will have squares cut out)
4) Tie square knots in the fringe along 3 of the 4 sides
5) Using the remaining quilt batting, stuff the pillow
6) Tie square knots in the final edge of the pillow
Finito!
Posted by
Sarah
In:
Crafts
Posted on
-
1 Comments
I felt the need to take on baby gifts this weekend. And I even completed them! Wonders never cease.
The first gifts that I made are for a couple little babies whose parents work in my office. They are personalized pacifier clips. The one on the left says "Shhhh" in beads. Hopefully she thinks that's funny, too! I wanted to make more, but she doesn't know what she's having, and I couldn't find any more nice gender neutral ribbon -- it was all boring or blatantly boy/girl. So I'll have to find more to go with this one. The other 3 are for a guy who just adopted a little boy. The beads say I {heart} Mommy and Daddy, and also his initials. I was going to put his name on one, but would you believe the bag of beads didn't include an "R"!? Guess the makers didn't play Wheel of Fortune enough to realize how frequently an "R" is needed! Oh well.
The next gift I made is a nap mat for my neice, who is due to be born in March. It was actually surprisingly quick and easy to make. By quick, I mean about 3-4 hours. But that's not bad! I'm going to make one for each of our kids, too. I quilted regular cotton fabric into large squares on the back (see the rolled up side), then the mat part is flannel. The blanket is a yard of fleece. I put queen sized quilt batting inside (I folded it 3 times to give it some padding -- so it's 3 layers of quilt batting). Then I just cut the edges of the fleece into fringe. That's the beauty of fleece -- no need to hem! The beauty of all this -- I sewed all the edges like a pillow -- I layered them all together (including the batting) and then just flipped it inside out and finished off the edge. I was actually giggly about how easy it was! The pillow is also just a couple pieces of fleece and is no-sew. I just made fringe and tied them in square knots. Then I put more of the quilt batting inside and finished off the edge. The roll is how the nap mat looks when it's all rolled up. I just added snaps to some grosgrain ribbon, sewed the ribbon into the seams, and it snaps together to finish it all off. Easy peasy! 

Posted by
Sarah
In:
Crafts
Posted on
-
0 Comments


|
Add this to your site |


